It has been a while since I’ve been part of a production team doing Revit work on a real building project. Recently, I’ve been thrown back into the thrill of pressing project management deadlines coupled with questionable Revit models (aka “the Dark Side”) – a humbling reminder of my many years of doing just that before moving into BIM management. Here are a few things I’ve been reminded of from this throw-back to reality. Yes, some of these are basic, but we can all use the reminders!
- First and foremost, keep it simple. Don’t over-model, but make sure you’re meeting the project requirements for Level of Development (Design, Detail…fill in the blank). There is no need to create a level for every stair tread. Really.
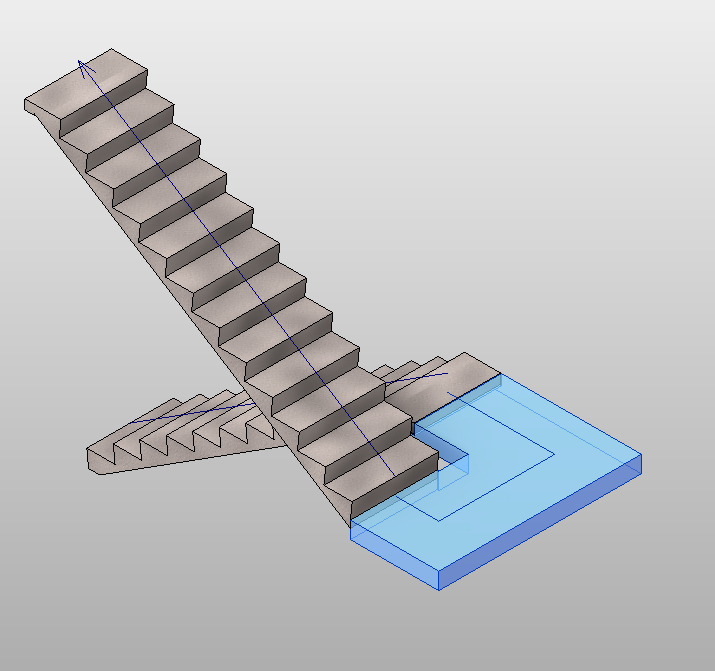
- Think the way Revit thinks. Revit is a modeling program. That’s what it does best. If you try to create a Revit model working strictly in 2D plan views, you will run into difficulty, I promise. While it is possible to create an entirely 2D plan in Revit (I’m *not* going to show you how!), it is better to remember that you are creating a 3D building model, and that sometimes it is best to create or modify parts of the model in a 3D view. Curtain walls, stairs (by component) and railings can all be modified, sometimes more easily, in a 3D view. View your building model in 3D to discover errors and clashes.
- Create as much of the model as possible before moving views onto sheets. Why? This is a personal preference, really. Change is inevitable. There’s something psychological about having to annotate a view because it has been placed on a sheet. Annotation should be saved until as late in the game as possible to avoid errors and/or duplication.
- Parameters are your friend. They are used to organize and provide information for the families used in the model. Shared parameters can be used across projects, and should be standardized as much as possible. Use hidden parameters in schedules to help with sorting and grouping. Understand the ramifications of changing a type parameter (changes every object of that family type in the project), or an instance parameter (changes a single instance of that object). My favorite tip for changing multiple instance parameters in a schedule is to uncheck the “Itemize Every Instance” box under Sorting/Grouping, change the cell that needs to be changed, and reapply “Itemize Every Instance”. Easy peasy.
- Finally, address those Warnings.
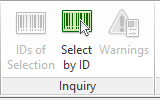
 Yes, some of them say that you can ignore them, but they are there for a reason. Something is wrong with the model. The more of these you can fix, the less chance of corruption in your Revit file. Each object in the warning has a numerical ID number. Clicking on the object in the warning dialog highlights it in the model, and Revit will even ask if you would like to go to a view that shows the object if it is not visible in your current view. Every object in a model is assigned an ID number. The Inquiry panel on the Manage tab gives options to view the ID of selected objects, search for an object by the ID number, and see all Warnings in the project.
Use the tools within Revit to your advantage. Think in 3D (we do anyway!). Keep it simple, and Revit On!


Howdy! This post could not be written any better! Reading through this article reminds me of my
previous roommate! He continually kept preaching about
this. I am going to forward this article to him.
Fairly certain he’ll have a very good read. Thanks for sharing!
Thanks, Jane! I hope he enjoys it.