Using PGP files
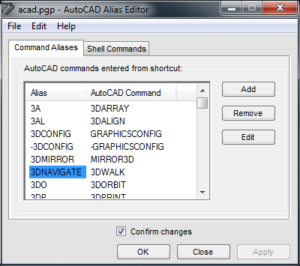
One way to add your own keyboard shortcuts is by editing the PGP (Program Parameters) file. In AutoCAD, this file is named “acad.pgp”, in AutoCAD LT, this file is named “acadlt.pgp”, and in BricsCAD, this file is named “default.pgp”. AutoCAD provides a user interface for editing the shortcuts, provided you have Express Tools installed. On the Express Tools Ribbon tab, in the Tools panel, click Command Aliases. This will open up a dialog that looks like this.
If you prefer to edit the raw file in Notepad, you don’t have to go searching for it, just go to the Manage Tab in the Ribbon, then on the Customization panel, choose Edit Aliases. This will open the proper PGP file in Notepad, proper because if you search for “acad.pgp” (or “acadlt.pgp” for AutoCAD LT), you would likely find multiple copies on your machine. If you edit the wrong one, nothing will change for you in AutoCAD.
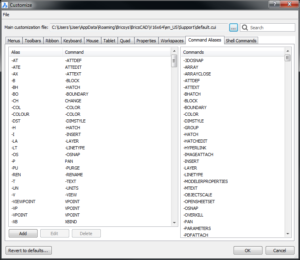
In BricsCAD, go to Tools > Customize > Command Aliases to get to the user interface dialog. It will look like this:
Both of the GUI tools in AutoCAD and BricsCAD are easy to figure out.
A better alternative
PGP defined shortcuts are a quick way to shorten a command name. Type in “L” for Lengthen instead of “Lengthen”, or type in “O” for 3dorbit, etc. There is another way to approach this issue however. If you define your shortcuts with lisp code, then you have at least two advantages: (1) You can define command statements, such as Zoom > Window or Pedit > Multiple, and (2) Lisp definitions will always take precedence over PGP shortcuts. So if the PGP file says “L” is for the Line command but your lisp code says “L” is for Lengthen, your “L” wins. Why is this important? If you’ve ever had to go use someone else’s CAD machine for whatever reason, how long does it take you to get your shortcuts set up (not to mention other things?) By defining your shortcuts as lisp in a single file, you can easily migrate to other machines with almost no effort.
So if you are thinking “But wait, I don’t know how to write lisp”, don’t worry, you only need to know what shortcut letter(s) you want and the command name you want it to call, plus any optional command options. We are going to do most of it for you here. Let’s get started:
- First, create a new empty folder on your C: drive to hold this file, call this new folder “CADSTUFF”.
- Next, open Notepad on your machine
- Before we write the first character, save the file in this new folder and name it “acaddoc.lsp”. (“on_doc_load.lsp” for BricsCAD) Important: Add the quote marks around the file name so that Windows will not append a “.txt” file extension.
- If you want to write a note to yourself in this file, use a semicolon prefix.
- Copy and paste the following blue text into your file: (defun c:L () (command “._lengthen” “_dy”))
- Save the file.
- Open AutoCAD/BricsCAD
- Run the Options command
- For AutoCAD: On the Files tab, expand the section “Support File Search Path”
- For BricsCAD: Under the Files section, edit the section “Support File Search Path”
- Add the path C:\CADSTUFF
- Move this path to the TOP of this list using the controls in the dialog box.
- Exit the Options command.
- Exit AutoCAD/BricsCAD
- Restart AutoCAD/BricsCAD.
- Try your new “L” command. Does it work?
- If you have reached this point successfully, you are done with the hard part.
You have just written your first lisp file. The name of the lisp file “acaddoc.lsp” (AutoCAD) or “on_doc_load.lsp” (BricsCAD) is special. It means that AutoCAD/BricsCAD will load this file each time a drawing is opened. Only the first file found will be loaded however, and that is why we moved the path C:\CADSTUFF to the top of the support file search path.
So how do you get more shortcuts in there? Open the file again and copy the first line and make a new second line. Now replace “L” with the shortcut of your choice, and replace “Lengthen” with the command you want it to call. If there are no command options, carefully remove the “_dy” part. Otherwise, edit this as needed too. Below is a sample “acaddoc.lsp”/”on_doc_load.lsp” file that contains several shortcut definitions.
The colors are only there for your benefit, they will not show up in Notepad obviously. Red the shortcut you want to type in, magneta is the name of the command, and blue are command option(s), if any. The gray lines with the semicolon prefix are comments. AutoCAD ignores this – it’s only for your information.
;;;==============================================================
;;; SHORTCUT FUNCTIONS
(defun c:b ()(command "._break"))
(defun c:clc ()(command "._laycur"))
(defun c:e ()(command "._erase"))
(defun c:ep ()(command "._explode"))
(defun c:ex ()(command "._extend"))
(defun c:l ()(command "._lengthen" "_dy"))
(defun c:nc ()(command "._ncopy"))
(defun c:oc ()(command "._offset" "_L" "_C"))
(defun c:ra ()(command "._regenall"))
(defun c:xo ()(command "._Xopen"))
(defun c:zv ()(command "._zoom" "_V"))
;;;==============================================================
Once you have this file, keep a copy on a flash drive or your network or where ever you might need it in the future. The only steps you need to take to get these shortcuts working on another machine are (1) Create the C:\CADSTUFF folder and drop this file in there, and (2) Add this folder to the top of the support file search path, (3) Restart AutoCAD\BricsCAD – there you go, in about a minute, you can have the same shortcuts set up on any machine.