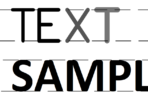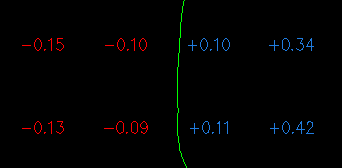
The goal here is to produce a cut and fill map similar to what is shown above, where:
- The positive and negative values are different colors
- The positive values include a leading “+” sign
- The negative values include a leading “-” sign
The inherit problem is that you want to place a single label and have it display the proper sign and be in the proper color. If you do not require the “+” sign, then you can do this in a different (and less complex) way. So back to our goal stated above. I have seen various ways of doing this, and this is probably a combination of a few of them as far as I can tell.
Make two Expressions
- Go to Settings > Surface > Label Styles > Spot Elevation.
- Right click on Expressions and Choose New.
- Give it a name of “move if positive”
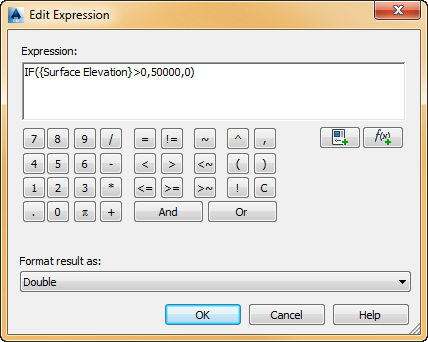
- In the Expression field, enter IF({Surface Elevation}>0,50000,0)
- Copy this string to the clipboard and press OK
- Create another new Expression
- Give it the name “move if negative”
- Paste in the same string as above, then change the > sign to a < sign, then press OK.

Create the Spot Elevation Style
- Create a new Spot Elevation Style
- Give it the name “Cut and Fill”
- Set the options on the General tab as you desire
- Delete any and all components present on the Layout tab
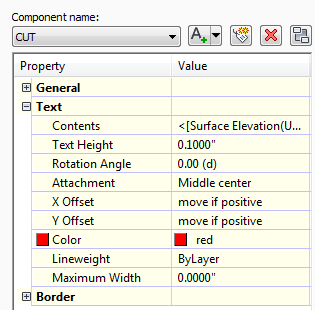
Add the CUT text component
- Add a new text component, name it CUT
- Click in the “Contents” field, then click the button that appears there.
- You are now in the Text Component Editor”
- On the right side text edit portion, erase whatever is there.
- From the Properties Dropdown on the left, choose “Surface Elevation”.
- Below that, under Sign, choose “Sign Negative -“
- Set any other options you want such as the precision, etc.
- When you are done, press the Arrow to push the Field over to the edit box.
- Close the Text Component Editor
- Under “X Offset”, choose the Expression “move if positive”
- Under “Y Offset”, choose the Expression “move if positive”
- Make any other changes you want such as color, angle, etc.
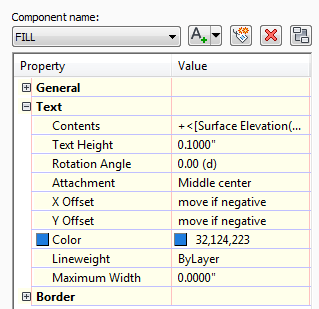
Add the FILL text component
- Add another new Text Component, name it FILL
- Click in the “Contents” field, then click the button that appears there.
- You are now in the Text Component Editor”
- On the right side text edit portion, erase whatever is there.
- From the Properties Dropdown on the left, choose “Surface Elevation”.
- Below that, under Sign, choose “Hide Negative Value”
- Set any other options you want such as the precision, etc.
- When you are done, press the Arrow to push the Field over to the edit box.
- EXTRA STEP ! Add a “+” sign as a prefix to this data.
- Close the Text Component Editor.
- Under “X Offset”, choose the Expression “move if negative”
- Under “Y Offset”, choose the Expression “move if negative”
- Make any other changes you want such as color, angle, etc.
- When you are done, close the Label Style Composer.
How it works
Since we added two components to the CUT and FILL label style, they will both show up whenever you place a Spot Elevation label. This is generally not a problem because both labels will reflect the same value (the Surface Elevation), you can control the draw order of the elements _and_ you can tell the FILL labels to ignore negative values.
But when you want to see the “+” sign and the “-” sign as a prefix, things get tricky. So we need some expressions in order to manipulate some part of the label at “run time”.
Expressions are used to modify certain input data and return a value to be used in a label. The first expression above named “move if positive” evaluates the Surface Elevation and if it is negative (less than 0.0), the expression returns 0. If the Surface Elevation is positive (greater than 0.0), then the expression returns 50000.0
Recall that we set the “X offset” and “Y offset” values of the “CUT” label to the value of the expression named “move if positive” So let’s say you pick a point to label whose surface elevation is -3.5. The expression is evaluated and since it is less than 0.0, it returns 0.0 to the “X” and “Y” label coordinates and the “CUT” label is displayed exactly where you pick.
The label is not done. Remember it is going to place a FILL label also. The Fill label has the “X offset” and “Y offset” set to the expression “move if negative”. The “move if negative” expression is just the opposite of the first one. It returns 0.0 if the Surface Elevation is positive and it returns 50000.0 if the Surface Elevation is negative. The point you picked to label had an elevation of -3.5, so the expression returns 50000.0 and this becomes the “X offset” and “Y offset” for the FILL label. In other words, it is 50000.0 units away and will not show up on your plan view.
Most other methods we have read about use an Expression to modify the text height instead of the X and Y offset. Obviously, by placing another set of labels 50000 units away, a Zoom Extents will reveal a surprise for an unsuspecting user. Let us know your thoughts on this.