Do you get annoyed at AutoCAD when those little blue boxes that appear on objects and quickly start mashing the ESC key? Are these blue boxes, better known as Grips, just in your way? Let’s take a look at Grips and how you might use them to your advantage instead of causing you grief.
Grips allow you to perform many tasks in fewer steps than you may realize. The most common editing commands are built into grips for all entities, including Stretch, Move, Rotate, Scale, and Mirror. Multifunctional grips offer even more editing commands that vary depending on the object type.
Grips are located at strategic points which also vary depending on the object. So think about this for a second; you select an object and a key point on that object is already selected. You have done two things with one pick, this is what makes pre-selecting objects so powerful. Now what exactly can you do with Grips? Let’s take a look.
Before we get started, we have to discuss the three stages of Grips. Cold, warm and hot.
- Cold (unselected): When you initially select an object, the blue Grips you see are cold. Cold Grips are also referred to as unselected and highlight the key points on a particular entity.
- Warm (hover): If you move the cursor over a cold Grip, the color changes to a light orange and changed to a warm (or Hover) grip. On certain Grips on certain object types, warm Grips will display a popup menu with available editing commands.
- Hot (selected): If you then pick a cold or warm Grip with the left button, the grip turns red and is now hot. Hot Grips are ready to be manipulated with the standard Grip editing commands.
When you select an object and make one or more Grips Hot, you are now in edit mode. If you look at the command line, you will see ** STRETCH **. Pressing the space bar or enter will start cycling through the other four editing commands (Move, Rotate, Scale, and Mirror). You are free to manipulate the hot gripped point with any of these edits. If pressing the space bar is not to your liking, then right click on a hot Grip for a shortcut menu.
** STRETCH **
Specify stretch point or [Base point/Copy/Undo/eXit]:

** MOVE **
Specify move point or [Base point/Copy/Undo/eXit]:

** ROTATE **
Specify rotation angle or [Base point/Copy/Undo/Reference/eXit]:

** SCALE **
Specify scale factor or [Base point/Copy/Undo/Reference/eXit]:

** MIRROR **
Specify second point or [Base point/Copy/Undo/eXit]:
The combination of different object types, different object grip points, and the various logical editing tools available for a given point lead to a collection of options that is too large to detail here. Experiment with various objects and see what you can do. For example, Lines have Grips at each endpoint and at the midpoint. Using Stretch on a line endpoint simply moves the one endpoint, and the other endpoint stays put. Using Stretch on the line midpoint causes the entire line to move.
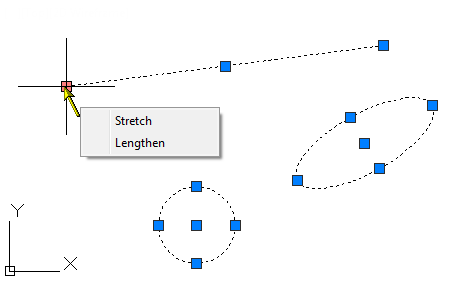
Multifunctional Grips offer even more options than the five commands listed above. For example, making a Line end point hot allows you to stretch (essentially move) that endpoint anywhere. But what if you want to extend a Line endpoint and not change the angle of the line? Instead of making the Grip hot, just hover over it to make it warm and a popup menu will appear with two options: Stretch and Lengthen. Now you can select Lengthen and perform the same action as if you had launched the Lengthen command with the DY option. The same applies to Arc endpoints.
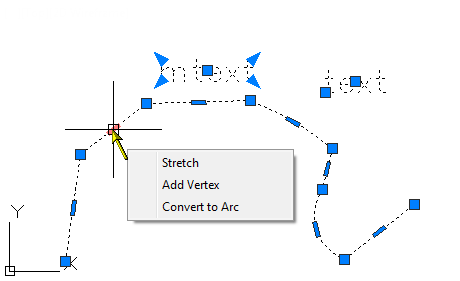
Polyline segments include a rectangle shaped Grip at the midpoint of each segment. One of the nice command options available with this midpoint Grip is the ability to convert a straight segment into an arc, or an arc segment to a straight one. This same Grip allows you to add a vertex.
Text objects include one Grip for the default bottom left and a second grip at any non default justification point such as middle center. The single Grip for Mtext objects is at the justification point, such as middle center, or top right.
Circles and ellipses have Grips at their center point and all four quadrants and there are no special functions for warm grips.
Selecting an object and then making one of its Grips hot is the fastest way to Move, Rotate, Scale, or Mirror that object since no right clicks or keyboard action is required
Hatch objects have a circular shaped grip with four commands available when you make it warm. Array objects and Table objects have a variety of different Grips that perform several different functions. Spline objects have a triangular Grip that is off to the side, to allow you to change the type of spline. Dynamic blocks may have various Grip types in any number of places.

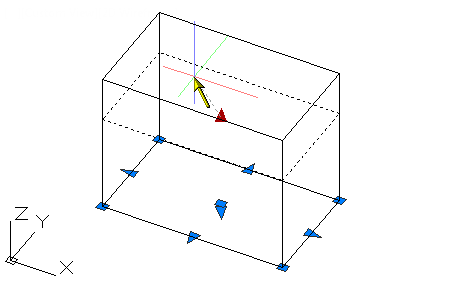
3D Solid objects have multiple Grip types available also for stretching, moving, etc. In the image below the cube is being enlarged by stretching the triangular grip “upwards”.
If you have been ignoring grips because you are unsure how to use them, don’t worry. Just dive in and start using them for performing edits. You might be surprised at what you find.
Note: The Grip colors mentioned above are the defaults, but you can make them any color you want. Run the Options command, Selection Tab, Grip Colors button. Make note of the several other Grip options available there also.